Thursday, August 28, 2014

How To: Properly Cleaning and Disinfecting Your Foundation Sponge


Hi Ladies! I filmed a really quick video on how to properly clean your foundation sponge today.  Sorry about the yellowness of the video....it's usually not like this because I don't usually film in my bathroom, but I needed the sink.

You can use this same method for makeup brushes as well...but the Burt's Bee's soap is the only soap I've ever used that actually cleaned my sponge....even Dawn didn't work. If you want to watch the video, I have it right above here, but if you're more of an step-by-step list girl, I have the whole process listed below! :)

Long story short, to disinfect your sponge, you're going to need to put an inch of water in a microwave safe bowl, and put your sponge in there.  Next, you'll want to microwave it for a minute, then let it stand for about five....it's going to be scalding.  After that, empty the bowl, add about a quarter-sized drop of any extra virgin olive oil and a fourth of a cup of the Burt's Bee's Extra Energizing Citrus & Ginger Root Body Wash to that.  Mix it together very well so you don't have an oily residue on your sponge or brushes.  Massage the olivey-soapy mixture into your sponge for a minute, then rinse it and squeeze the excess out.  It should be clean, but just in case, you can repeat the last step by massaging the mixture onto your sponge again.  Anyways, I hope this makes it easier for all you sponge loving ladies!  

I used the Real Techniques Miracle Complexion Sponge, and the Burt's Bee's Extra Energizing Citrus & Ginger Root Body Wash....you can use any extra virgin olive oil you want though. 

http://www.ulta.com/ulta/browse/productDetail.jsp?productId=xlsImpprod5960824

http://www.burtsbees.com/Extra-Energizing-Citrus-Ginger-Body-Wash/23099-00,default,pd.html

Wednesday, August 20, 2014

Anastasia Beverly Hills AMREZY Palette Review

Recently, I've been seeing a lot of YouTuber's using the AMREZY Palette by Anastasia Beverly Hills.  At first, I really disliked the colors in the palette, so I was not going to purchase it.  After watching more tutorials, I realized that it was a very versatile palette, and since I didn't own anything from Anastasia Beverly Hills, I really wanted to try something.  I caved, and spent the $29 on the palette, and all I can say is that it was a great investment! 


So let's start with the packaging......it looks cute, but it is sort of a cheapy cardboard.  I don't mind it, but I love the metal packaging of the Naked 2, and Naked 3 palettes.  It stays shut!  And while I haven't had any problems with the palette opening, I'm scared that it could happen, and then my palette would be destroyed.  But never the less, if the packaging saves me $10-$20, then I'm all for it.  The other suck part is the mirror....it basically sucks.  I won't lie, it's like a fun house mirror.  So that's kind of crappy.  The palette comes with a double-ended brush, and it's not a great quality brush, but it's good, and it gets the job done. 


Now to the good part....the eyeshadows! The top row of colors are all shimmery, and the bottom row are matte, with exception of "Vanilla," which seems to be more of a satin.  The formula for all of these shadows are super buttery, especially the matte shades.  The swatches in the picture below do no justice to these shadows because they are extremely pigmented and they are so build-able!  I am so happy that I bought this palette....it was definitely worth the money! 


 I did film a new YouTube video today using this palette, and this is the look that I got with it...I hope you guys like it, and I will link down below where you can buy the palette. <3
For all the products I used to get this makeup look, check out my tutorial on YouTube
Here is the link to my video: https://www.youtube.com/watch?v=DcyKE4HR3Sc&feature=youtu.be


I was inspiration for this makeup look comes from this picture off of pinterest done by @missjazminad


http://www.pinterest.com/pin/167196204891110939/


You can purchase this palette here:

Tuesday, August 5, 2014

Arabic Inspired Makeup...video? Let me know!


I posted a video of my foundation routine, but I thought I'd add these pictures so you could 

get a better look at my makeup, which was Arabic inspired.  I really loved the way this 

turned out....if you'd like me to post a video so you could re-create this look, let me know! :)


Flawless Foundation and Contouring Routine!

Hey ladies! 

Here is my take on a flawless foundation routine!  The link will be listed below, as are all the 

products I used, and where you can get them.  Hope you enjoy! :)


Real Techniques Expert Face Brush - http://www.ulta.com/ulta/browse/productDetail.jsp?productId=xlsImpprod4260015

Real Techniques Miracle Complexion Sponge - http://www.ulta.com/ulta/browse/productDetail.jsp?productId=xlsImpprod5960824

Real Techniques Blush Brush - http://www.ulta.com/ulta/browse/productDetail.jsp?productId=xlsImpprod3220067

Other Real Techniques Brushes ( they come in sets ) - http://www.ulta.com/ulta/browse/productDetail.jsp?productId=xlsImpprod3220069
http://www.ulta.com/ulta/browse/productDetail.jsp?productId=xlsImpprod3220081

Maybelline Fit Me Foundation in 240 - http://www.ulta.com/ulta/browse/productDetail.jsp?productId=xlsImpprod2980151

Nars Sheer Glow Foundation in Medium/Dark 03 - http://www.sephora.com/sheer-glow-foundation-P247355?skuId=1202167

Coastal Scents Eclipse Palette - http://www.coastalscents.com/pl-026.html

NYX HD Concealer in Yellow - http://www.ulta.com/ulta/browse/productDetail.jsp?productId=xlsImpprod3460285

bareMinerals Concealer in Summer Bisque  - http://www.ulta.com/ulta/browse/productDetail.jsp?productId=prod2093950

Mac Bronzing Powder in Matte Bronze - http://www.maccosmetics.com/product/shaded/159/302/Products/Face/Powder/Bronzing-Powder/index.tmpl

Jane Bronzer in Empower - http://www.ulta.com/ulta/browse/productDetail.jsp?productId=xlsImpprod5770369

Physicians Formula Blush - http://www.physiciansformula.com/en-us/productdetail/face/blush/07549.html

Mac Mineralized Skin Finish in Soft' n Gentle - http://www.maccosmetics.com/product/shaded/159/30735/Products/Face/Powder/Mineralize-Skinfinish/index.tmpl

Friday, July 25, 2014

NYX Eyebrow Gel


Hey guys!

 I've been in the market for a new brow product recently, as I haven't been liking the 
"fuzzy" effect I get from my Rimmel London Eye Brow Pencil....so before I tried anything 
super expensive, I wanted to try something a cheaper alternative.  I ended up buying the 
NYX Brow Gel in the color "Black."


So, starting with the cons......there are only five colors! The I bought the darkest color, 
which I didn't want to   because I tend to like a slightly lighter brow, but the next shade down was chocolaty brown, which was too warm for my my black hair.  Also, if you don't wear makeup with the eyebrow gel, it looks way too harsh, especially for people like me 
with darker hair. The only other thing I could say is it is so pigmented...now this can be a good thing, or a bad thing, depending on the person, but for me, I think a slightly less pigmented gel would be better because it is unforgiving, and waterproof.  If you mess up, you need to wipe this away quickly so it doesn't set.  I did not buy the brush that NYX sold with it, but I am kind of regretting it.  The brush that I used in the picture above just did not cut it for me.


On to the pros!
 I think the end finish of this gel actually looks pretty good, and I'm hoping that maybe if I 
buy one of the lighter shades I can mix them together and make a perfect color.  Also, you 
literally need a tiny drop of this for both eyebrows.  It will last you forever because it is so 
pigmented.  And lastly, this is a great product for people who want waterproof, 
long lasting makeup.  I tested it out on my hand and scrubbed it with soap 
water and it still didn't come off.  
You will definitely need an oil-based makeup remover to     
take this off.  I would recommend this to people who like a sharper, more defined brow.  
If you like a softer looking brow, then this probably isn't the brow product for you.


In the first picture of me, I have only my eyebrows done....which as I said before, is way 
too harsh.  Once I finished the rest of my makeup, I think it looked a lot better, although it's
 still a little dark for my liking.Anyways, I hope you guys liked my review...if you'd like to see more reviews, leave me a comment down below on the products you'd like to see! :)

Sunday, July 20, 2014


Hey guys!

 Here is my newest video on my. Top 10 Must Have Products!  I know I haven't posted a lot, 
but within the next day or two I will have a review for you all on a brand new 

product.  I hope you enjoy :) click the link below to see the video


Tuesday, July 8, 2014

Makeup in 10 Minutes or Less!

Here is a quick makeup tutorial that you can do in 10 minutes or less, which is great for me because I am literally ALWAYS late! The link is down below...I hope you enjoy! :)


Tuesday, June 17, 2014

Dramatic Smokey Eye Tutorial

Hey Guys!

 I wanted to quickly post my new tutorial...and let you know that I will be posting 

more frequently, but I have been very busy with family being here, and my son at the 

hospital lately, but that should be coming to an end.  So, here it is! I hope you all like it! 

 CLICK THE LINK DOWN BELOW!

Here is the link! Let me know if there is anything you would like to see! :)

Thursday, June 5, 2014

May Favorites 2014

Hi guys! I know I have been gone for a while, life has gotten in the way a little bit for me these past few weeks, but nevertheless, here is my May Favorites video! I hope y'all like it. :)


Let me know if there is something you'd like to see! -  Jensen

Tuesday, May 13, 2014

The Urban Decay Naked 3 Palette

Hi Everyone!

I'm back with another review...this time, on a very well known palette;  The 'Urban Decay Naked 3 Palette.' Although it has been around for a few months now, it is new for me.  
I had originally wanted  to purchase this when it came out towards the beginning of the year, but, every time I went to Ulta, they were out of stock.  Eventually, I made my way to Sephora...the first one I have been to since I moved out of state(a whole year ago)! Anyways, they had the palette, which retails for $54.00. 
I do have the 'Naked 1' and 'Naked 2' palettes, so when I saw that 'Urban Decay' was coming out with a third palette, I had to have it!

At first glance, you can see that the tones in the palette range from warm to cool, and they all have a rosy hue.  This was part of what drew me to this palette.  The 'Naked 1' palette has warm-toned neutral shades, and the 'Naked 2' palette has cool-toned neutral shades.  While both those palettes are very nice, I know you can find tons of warm brown shadows, and cool brown shadows anywhere.  This palette is unique!
I appreciated the fact that the palette has the same hard, metal case that the 'Naked 2' palette has, except this one has a different design on the front.  Nevertheless, it is a great quality, sturdy case.  It clips so it won't open unless you want it to, which makes it great for travelling.


Before I get into the swatches, I wanted to mention the brush that this palette comes with.  This brush was very disappointing.  The flat side of the brush, with the more tapered end was very hard to work with as it doesn't pick up the lighter shades in the palette very well and it mutes the colors.  On the other sided of the brush, there is a fluffier side, for blending, which was even worse than the flat side.  It's too dense to blend the eye shadow, and as well as that, it's just to thin....I much prefer the double-ended brush that came with the 'Naked 2' palette.  I also think that the brushes are way too scratchy, and they poke your eyelids.  But anyways, let's get to the swatches!


The first four shades are called, 'Strange,' 'Dust,' 'Burnout,' and 'Limit.'  While 'Strange,' 'Burnout,' and 'Limit,' have a great payoff, and very creamy texture, 'Dust' is a complete letdown.  It looks better on my hand in the swatch than it does applied to your eye.  I think the warmth helped pick up a little more pigment, but once I put the color on my eyes it pretty much faded away.  I even applied a little more to my eye after I finished all my eye makeup and it just wouldn't stick....even though I used a setting spray on my brush.  'Limit' is one of my favorite shades from the palette, and it makes an amazing transition shade on your crease.  This color would work well with any skin tone.  I like 'Strange,' but for my personal taste, I'd rather have a shimmer on my brow bone.  'Burnout' is a nice, pale, pink that would works well for me as a transition shade, but it would work well on the lid for someone with lighter skin.


'Buzz,' 'Trick,' 'Nooner,' and 'Liar' are the next four shades in the palette.  I was very disapointed with 'Buzz' and 'Trick' because they are gorgeous colors, but it was very hard to get a decent payoff from them.  I had to keep going back and applying more to my eye to get the color to show up.  'Nooner,' and 'Liar' are my two favorite shades from the palette! I like to wear 'Nooner' in the crease as a transition shade, and 'Liar' all over my lid.  I've worn this look almost everyday for a month straight.  'Liar' is definitely the most unique shade in the palette.  On the surface it looks like a taupe color, but when you apply it, it has a very warm, rosy pink sheen to it.


The last four colors in the palette are 'Factory,' 'Mugshot,' 'Darkside,' and 'Blackheart.' The color in this palette I was looking forward to the most was 'Blackheart.'  And while it did have a nice payoff, the magenta shimmer in the palette did not pick up on my lid, which was a big let down.  'Factory,' and 'Mugshot' ending up being great, with a lot of dimension to them and a very smooth finish.  'Darkside' has a nice payoff, and a nice texture, but I have not picked up this color very often as it was a little to cool-grey toned for me.


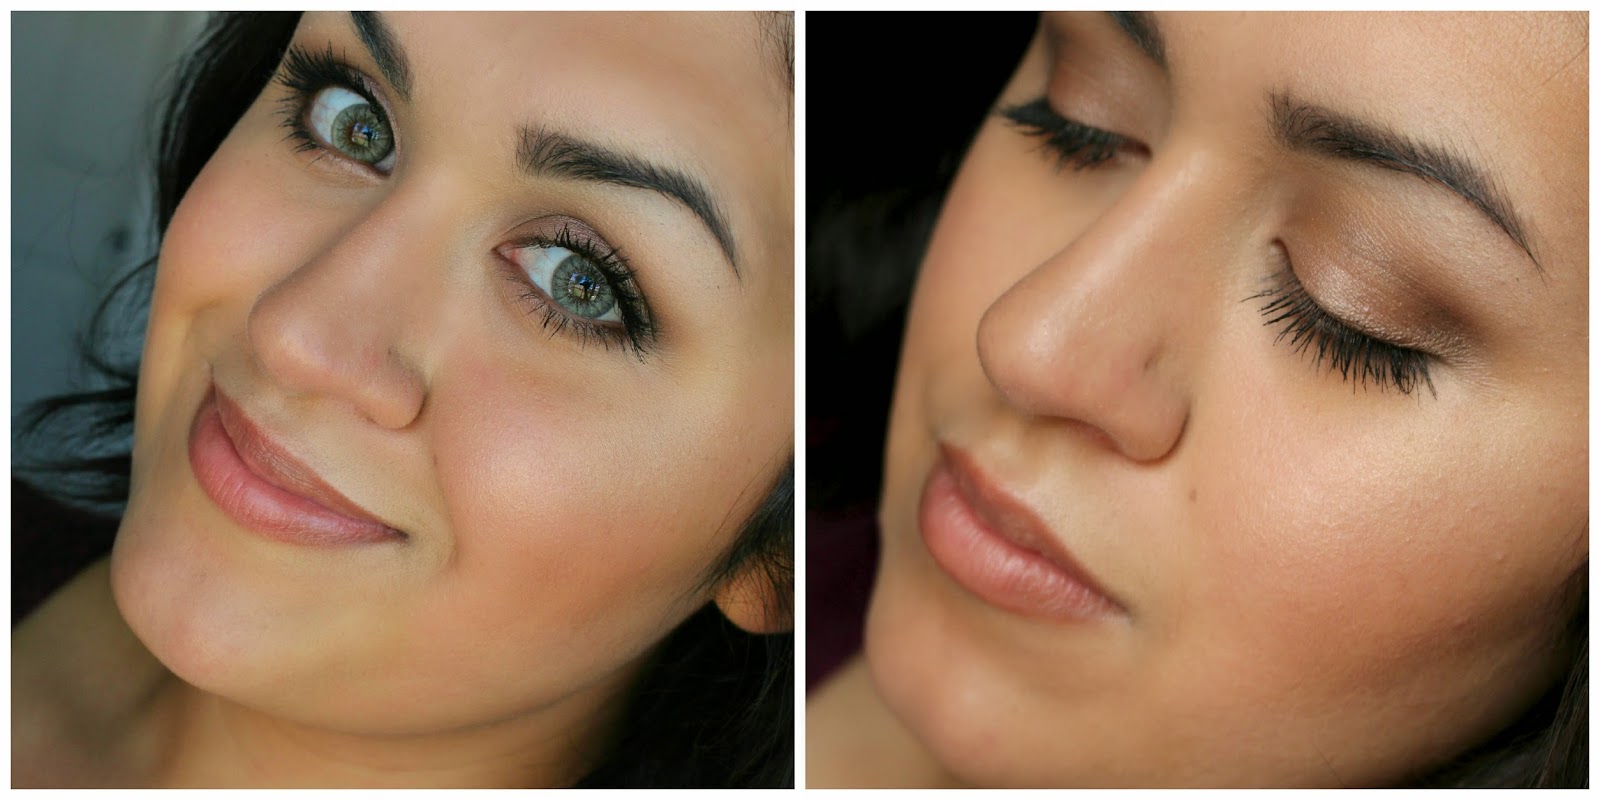
This was a look I created using this palette.  I have 'Nooner' and 'Burnout' in my crease as a transition shade, and I put 'Darkhorse' in the crease, and dragged in inwards.  I blended it with a small amount of 'Mugshot' and 'Liar.'  I used 'Dust' on the inner third of my eye, and as you can see, they color did not come out good at all, and there is only a small amount of sparkle.  I also used 'Strange' on my brow bone, which worked well, but it just wasn't enough for my coloring, so I added another shadow from a different palette to brighten the area up.  When I worked with all these colors and blended them all together, it gave me a very rosy-toned, purple smokey eye.  

 I do think this is a great palette, but if you are just starting to wear makeup, I would recommend the 'Naked 1' or 'Naked 2' palette.  The eye shadows from those palettes are easier to work with.  But, if you are a little more experienced, I would definitely recommend this palette! The colors are beautiful, and you can create a truly beautiful look.  The shadows in this palette will help you create a truly, soft, and romantic look.  I think this would be a great palette for anyone who wants a super girly, and feminine look, and for someone who doesn't have time to touch up their makeup throughout the day.  With an eye primer, this shadow with last you all day long.


If you like the look I made the tutorial using the 'Urban Decay Naked 3' palette, come check out my tutorial! :)


Thursday, May 8, 2014

BECCA Shimmering Skin Perfector Pressed - Moonstone


Hey Everyone!!

I have recently been on the search for a great highlight, and decided to do some research.  After watching a ton of videos on youtube, I found a lot of great reviews on the "BECCA Shimmering Skin Perfector Pressed."  In almost every video I saw, the beauty gurus were raving about the shade, "Opal."  Unfortunately, when I went to order it online, it was out of stock, so I opted for "Moonstone" instead, which has golden glow.  

All I can say about this highlighter is that I am in LOVE! 

It is a great powder highlighter for anyone who loves a luminous glow, but hates glitter or sparkles on their cheeks.  


The packaging is nice and sleek, and has a little bit of a weighted feel to it.  It doesn't look, or feel cheap.  Which is great, considering it retails for $38.00, and I believe it is totally worth it.  I have spent a good deal of money on drugstore and high-end highlighters and I've never tried one (in powder form) that seemed to melt into my overly-dry skin.

The back of the box describes the product as follows:

"A creamy powder luminizer that absorbs and reflects light for a superb natural glow."

This is a very bold statement, and it had me sold on trying  it, but if that doesn't grab your attention, then please the description that Sephora has listed for this product....


"Find refined luminosity in any light—this formula features ultra-fine luminescent pearls that absorb, reflect, and refract light so your natural radiance is never lost. Unlike the traditional pressed powder method which simply mixes and compresses dry ingredients, this unique process blends pigments with proprietary liquid binders, resulting in unparalleled, creamy application with balanced color dispersion. Like a compact full of crushed gemstones, the multi-toned, ultra-fine pigment pearls adjust to skin’s natural undertones for a truly unique glow."


Just by swatching it on my hand, I noticed how it went on to my skin as if it were a cream product....it literally seemed to melt into my hand, and though there is shimmer, it is ultra-fine, so upon applying, it is unnoticeable.  

When I applied it to my face(with a fluffy brush), it immediately won me over!  My skin was glowing...WITHOUT glitter and sparkle. It really does feel and look creamy just as the description implies.  I love that this doesn't sit on top of your skin, or look frosty, as so many others do.  Frostiness in a facial highlighter is a major deal breaker for me.  As you can see from the images below, it gives you a subtle glow, but the intensity can be built up by using a dense brush, or applying more than one layer to your face.  I think this is a great highlighter not only for adding more dimension to your face....but I think it is great just to help brighten up a dull complexion.  
I would definitely recommend this to any skin type.  It's a powder, so if you have oily skin it will help to absorb the oil, but it's also a very creamy powder, so for people who have dry skin, it absorbs and looks flawless.  While this is a pricier product, I do believe it is truly unique and worth the investment...I have never tried another highlighter like this, or another powder like this at all, and I am so happy that the description lived up to what it claimed.  I will definitely be purchasing the other two colors, "Opal," and "Topaz," in the future.  "Moonstone" is definitely a great shade for my skin tone, but I'd like to have the other colors for the change of seasons for when my skin gets darker and lighter.

After trying the BECCA Shimmering Skin Perfector Pressed and being completely smitten with it, I will definitely be trying more products from the BECCA Cosmetics line.


The BECCA Shimmering Skin Perfector Pressed can be purchased at Sephora, 

http://www.sephora.com/shimmering-skin-perfector-pressed-P381176?skuId=1538099

Don't forget to check out my youtube channel, where I did a demo of this product, and compared it to two other high-end highlighting powders!

https://www.youtube.com/watch?v=14u-t98A6Fw